Configure IMAP for Apple iPhone and Apple iPad
Feedback Information
Tracking Number: {{TRACKINGNUMBER}}Feedback Version: {{FEEDBACKVERSION}}
CVE ID: {{CVEID}}
Feedback Dates
Reported Date: {{REPORTEDDATE}}Last Modified Date: 1/13/2024
CVE Publish Date: {{CVEPUBLISHDATE}}
Feedback Hours
Estimated Hours: {{ESTIMATEDHOURS}}Actual Hours: {{ACTUALHOURS}}
Full Description
Enabling IMAP on Your iPhone
Enabling IMAP is an excellent choice for synchronizing your email on your iPhone and staying connected with your messages across multiple devices. IMAP simply means Internet Message Access Protocol, and it serves the function of allowing your email service to communicate with your phone.
Let's walk through the steps to add IMAP account iPhone so you can start receiving emails right away.
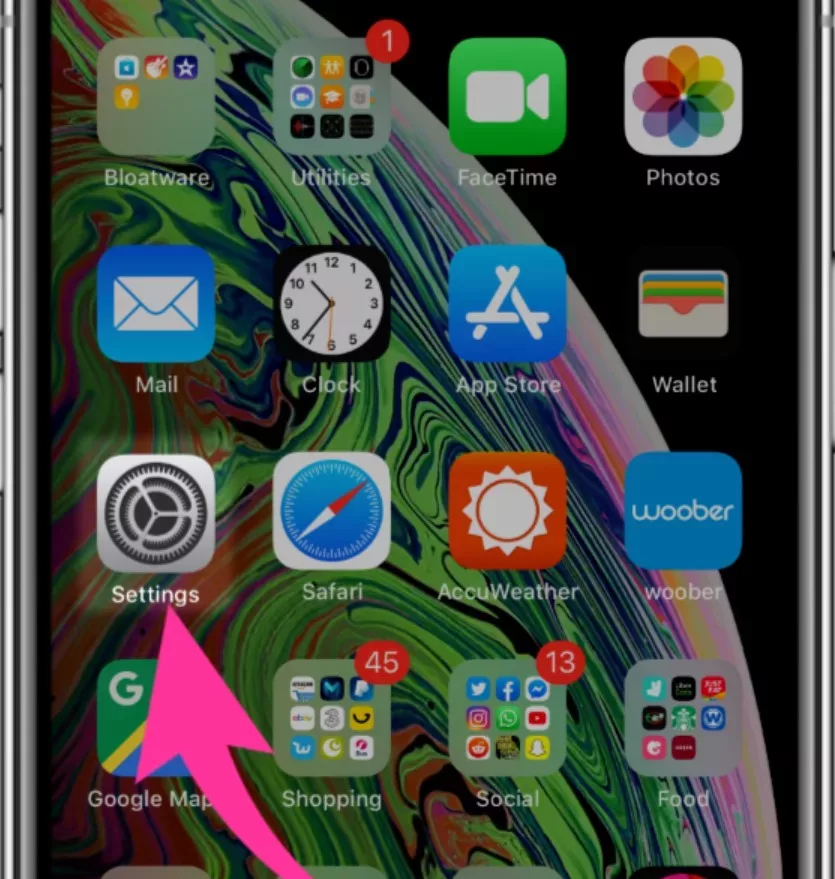
- Step 1: Access Settings.
- Begin by opening the Settings app on your iPhone. It's typically grey with gears on it.
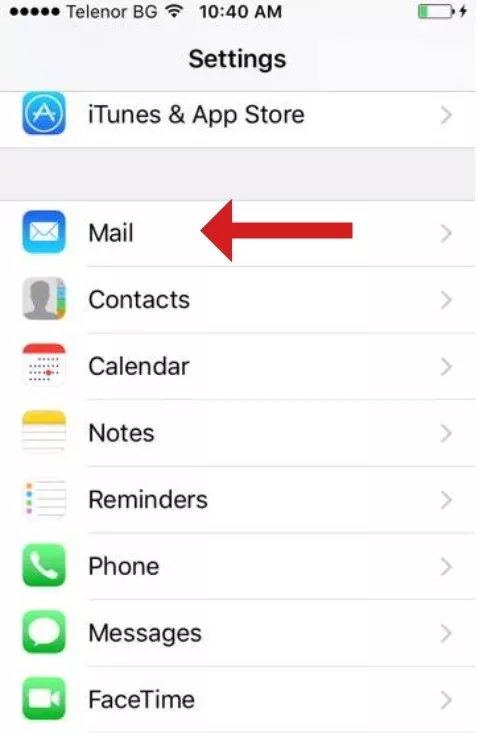
- Step 2: Find Mail Accounts
- Swipe down and click on either "Mail" or "Mail & Accounts," which will vary with your iOS.
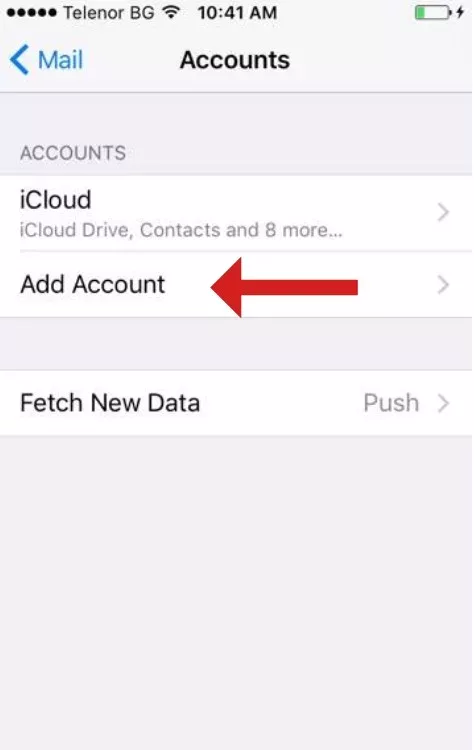
- Step 3: Add a New Account
- Press on Accounts, followed by choosing Add Account.
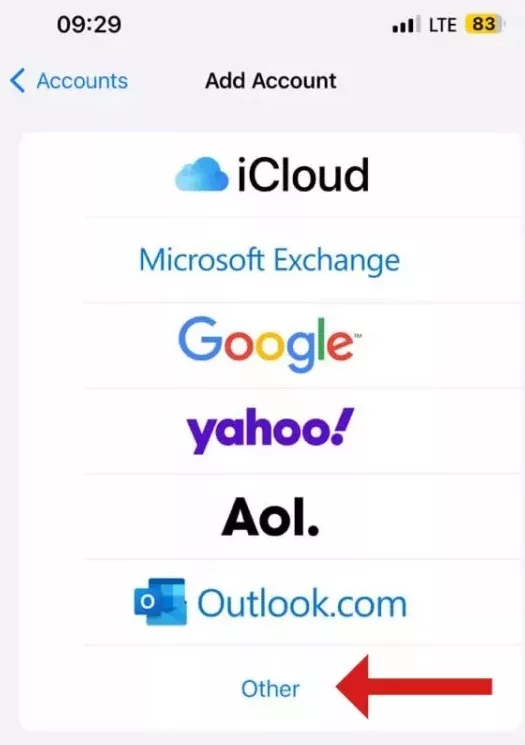
- Step 4: Choose Other Account Type
- You will be provided with multiple email service options. Since IMAP isn't always automatically chosen, tap on Other.
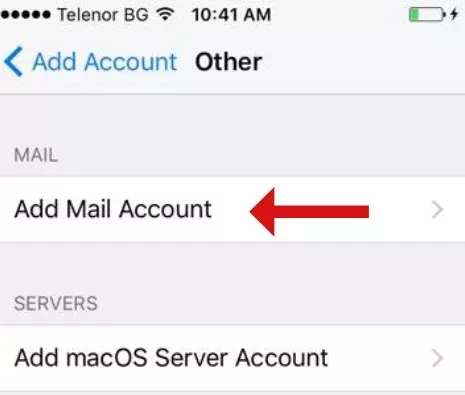
- Step 5: Add Mail Account
- Choose the "Add Mail Account" option.
- Step 6: Enter Your Email Information
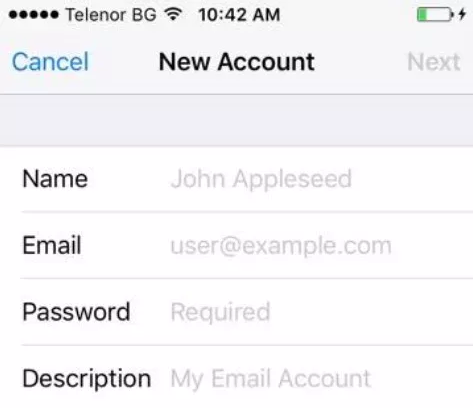
- Fill in the details shown.
- Name: This is your name as you would like it to show on your emails.
- Email: This is your email address.
- Password: This is your account password.
- Description: This is the description you want to call this connection. This is often your email address.
- Step 7: Select IMAP and Enter Server Details
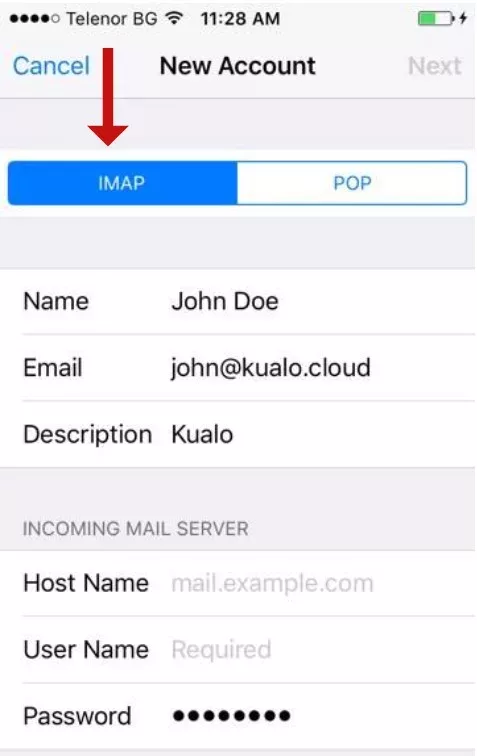
- Important: Ensure IMAP is selected for the account type.
- Then, you'll need to enter your email provider's specific server details for incoming and outgoing mail servers. These will vary depending on your email provider. You can typically obtain these details from your email provider's official website or through direct contact with their helpdesk.
IMAP
- Name: This is your name as you would like it to show on your emails.
- Email: This is your email address.
- Password: This is your account password.
- Description: This is the description you want to call this connection. This is often your email address.
Incoming Mail Server
- Host Name: mail.fawkesdm.com
- Note: Do not add http:// or https://. All you need to add is the mail.fawkesdm.com.
- User Name: This is your email address.
- Password: This is your account password.
Outgoing Mail Server
- Host Name: mail.fawkesdm.com
- Note: Do not add http:// or https://. All you need to add is the mail.fawkesdm.com.
- User Name: This is your email address.
- Password: This is your account password.
- Step 8: Save the Account
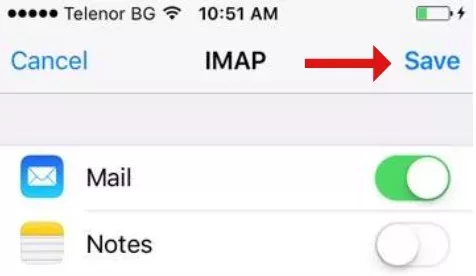
- After entering all the details in IMAP settings iPhone, hit "Save." With that, you have successfully been able to enable IMAP iPhone.
Checking if IMAP is Enabled on an iPhone
Before looking into your email setup, it's important to confirm IMAP is enabled on your iPhone. This preliminary step ensures that you're working with the correct email account type and avoids any unnecessary settings adjustments if IMAP is already active.
Here's why it is crucial to check email account type: IMAP facilitates real-time synchronization of your emails across different devices. If your iPhone is set up with a different protocol, like POP3, your email experience might not be as fluid or accessible on other devices.
To check whether your iPhone IMAP settings are set up correctly, proceed with the following easy steps:
- Go to your iPhone's Settings app.
- Scroll down and tap "Mail"; this will lead you to the mail settings.
- Select "Accounts" to view a list of all email accounts linked to your iPhone.
- Tap on the email account you want to review. Here, you can see if it's set up as an IMAP or a different account type.
- If the account type mentions IMAP, you're all set! If not, you might consider switching to IMAP.
Understanding IMAP on an iPhone
Understanding IMAP on an iPhone can significantly enhance your email handling, especially if you're frequently on the move. There are numerous IMAP benefits iPhone users will appreciate. Let's explore how it enhances the efficiency and user-friendliness of your mobile email management.
One of the primary advantages of using IMAP is its ability to seamlessly sync your emails across multiple devices. This means that whether you're checking your email on your iPhone, laptop, or tablet, your messages and their status (read, unread, deleted) update in real time on all devices. This cloud email feature ensures that your email experience is consistent, no matter where you access your inbox.
Moreover, with IMAP, your emails stay on the server. This is particularly useful because it means you don't have to worry about losing emails if your phone encounters a problem or if you switch to a new device. Everything stays intact in the cloud, available for access anytime and anywhere you require it.
This setup is perfect for shared email accounts, too, such as those used by teams or families where multiple people need access to the same inbox. It ensures everyone can see all messages and their current status, enhancing collaboration and communication.
Troubleshooting IMAP Connection Problems
If you're experiencing IMAP not working iPhone, don't worry, you're not alone. Setting up IMAP can sometimes run into snags, like a connection error, but with a few troubleshooting steps, you can usually get things running smoothly again.
Firstly, check your port numbers. IMAP uses specific ports to connect to your email server. If these aren't correctly configured, your iPhone won't be able to retrieve your emails. Typically, the secure port for IMAP is 993. Make sure it's set correctly in your mail app settings.
Next, consider authentication issues. Your email app needs the correct credentials to access your email server account. Make sure you've typed them correctly. Sometimes, you might also need to ensure that less secure apps are enabled, especially if you are using older email services.
If you're still stuck after these steps, It may be necessary to consider additional assistance. Troubleshooting email iPhone issues can be tricky, and if basic steps don't resolve the problem, contacting your IT department or email provider is a wise move. They can offer more tailored advice depending on your account settings and their server requirements.
Should IMAP Be Enabled?
When considering how to manage your emails on your iPhone, choosing the best email protocol for your needs is crucial. IMAP use cases often make it the ideal choice for most users, as it allows for real-time synchronization across all devices.
This means that whether you're reading an email on your phone or computer, the status updates are everywhere—keeping things seamless and efficient. However, there are specific POP3 use cases where it might be preferable.
For instance, if you have limited server space or need access to your emails without an internet connection, POP3 is beneficial because it downloads emails to your device and can be accessed offline.
How to Locate IMAP & SMTP Settings on iPhone
When you're looking to find IMAP settings iPhone, start by opening the Settings app. From there, navigate directly to Mail and then tap on Accounts. Choose the email account you wish to check, and you'll see an option for Account where the IMAP details are listed.
Similarly, for the SMTP iPhone (outgoing mail server) settings, within the same account settings, look for a section labeled "SMTP" or "Outgoing Mail Server." This section might be located above the IMAP settings. Tapping on "SMTP" will reveal the server details. This is crucial, particularly if you're setting up your email to send messages efficiently.
When it comes to advanced email configuration, accessing these settings allows you to adjust aspects like server ports or authentication methods, which can be vital for ensuring your email operates smoothly and securely across different networks.
Password Resets and IMAP
If you've forgot email password or need to reset IMAP password iPhone, it's essential to update these details to maintain seamless access to your mail.
Here's a simple guide to update iPhone mail settings after a password change. Start by accessing "Settings" on your iPhone and clicking "Mail." Select "Accounts" from there and choose the email account you need to update.
Most email providers offer a straightforward password recovery process on their websites if you've forgotten your email password. Once you've reset your password, return to your iPhone settings and tap "Account." Here, a setting is available to modify your password.
Updating your password here is crucial because IMAP syncs this information across all devices using the account, ensuring that you don't miss important emails or encounter service interruptions.
Apple and IMAP: What You Need to Know
If you're using an iCloud mail IMAP setup on your iPhone, you're in for a smooth ride across your Apple devices. IMAP allows your Apple email to stay updated regardless of your device. IMAP keeps everything in sync, whether you're checking mail on your iPhone, iPad, or Mac.
So, what's the big deal here? Well, IMAP technology means that when you mark an email as read on your phone, it's also marked as read on your laptop. No more dealing with multiple notifications for the same email! This syncing is part of what makes the seamless Apple device experience so appealing. It's like having a conversation across different devices that never misses a beat.
IMAP Security Considerations
When setting up IMAP on your iPhone to manage your emails, there are several security considerations you should keep in mind to ensure your IMAP security and overall email privacy. Here's a straightforward guide to help you protect your inbox effectively.
First off, strong passwords serve as the foremost line of protection. Choose an email password that's easy for you to recall but difficult for someone else to predict. It's not just about choosing a strong password once; consider updating your password regularly to keep potential intruders on their toes.
Next, where available, activate two-factor authentication (2FA) to enhance your account's security significantly. This usually means that after you enter your password, you'll also need to enter a code sent to your phone or generated through an app. It adds a significant barrier against unauthorized access, as having just the password won't be enough to breach your account.
Also, be mindful of the networks you use to access your email. Public Wi-Fi can be a hacker's playground. Using public Wi-Fi to check your email can expose you to risks without proper security. When using public Wi-Fi, connecting via a Virtual Private Network (VPN) is crucial for security.
Conclusion
Enabling IMAP on your iPhone can significantly optimize your iPhone email setup, making it easier to manage your messages efficiently. This feature is particularly beneficial for those looking for efficient email management strategies, allowing for seamless access and synchronization of emails across various devices.
With IMAP, your iPhone acts more like a window to your email everywhere, updating in real-time, so you're always on top of your messages without the hassle. Not only does this modern email management solution keep you connected, but it also enhances your productivity, ensuring that your communication needs are met with speed and ease.